background

Wednesday, September 29, 2010

Jingle Balls


I forgot to record the copic colours I used on this card but I think they were R39. R29, R27, YG99, YG95, YG93, BG75, BG72, Y26, Y13, C9, C7, C5, E39, E35, E34, B0000. The patterned paper is "Jovial" from Basic Grey and black and red Bazzill cardstock. The stamp is Whipper Snapper "Jingle Balls". The embellishments were red satin ribbon, Making Memories Poinsettia flowers edged with black ink and the centres were white pearls I coloured with copic Y26. I added some Glitter Ritz Cool Highlight glitter on the snow.

Fall Thankyou


I made this card for the iLoveCopic challenge using yellow, orange and brown. I also decided to make it into a thankyou note for someone special. The image is Imaginisce Apple Cider Collection "Pumpkin" and it was coloured with copics - YR12, YR14, YR16, YR18, E39, E35, E34, YG99, YG95, YG93. The background printed paper is from Provo Craft "Flutter Things" and Bazzill cardstock in orange, brown, and yellow. The maple leaves were punched using an assortment of scraps, some run through Cuttlebug embossing folders for texture, in an array of colours from deep red, shades of brown, yellow, and orange.

Tuesday, September 7, 2010

Craft Room before


This is the mess I had before. Spent more time trying to find stuff than I ever spent working on a project. So frustrating. This bedroom is very small - 8x9'. I had to find something that would allow me plenty of storage space (organized storage) and a large surface to work on. That's were "Best Craft Organizers" came in. Fits the bill perfectly as you will see from 2 earlier posts - reno finished.

Quilting Closet Before and After


These are two pictures of my closet I used for storing extra scrapbooking supplies and some quilting fabrics. Before it was a jumbled mess.Now, I have another unit beside my desk for all my sewing notions, extra scrapbooking supplies now fit into other drawers or onto bookcase freeing up the closet for most of my quilting fabrics that before where squeezed into many different cupboards and almost impossible to find or access. Still needing some more rubbermaid bins but it is coming along.

Craft Room Renos Complete


Here a few pictures of my room finished. Doors still need painting but otherwise done. A very small room but made the most of it with a unit that has a good working space and lots of storage - lots of little drawers to organize things, easy access and lots of rack space for papers, nice big bookcase for larger items, good light, everything pretty much at my fingertips.

Monday, September 6, 2010

Sarah Kay Anniversary Card


Boy, I seem to be on a roll. Decided to get a jump start on some cards I need for upcoming events. This is one I made for my daughter and her husband's anniversary coming up in October. The image is a Stampavie Sarah Kay stamp called First Kiss. It was stamped with Memento Tuxedo Black ink and coloured with Copics - E11,E00,E49, E59,E57,E25,E55,E53,YG99,YG95,Yg93,YG91,W00,W2,W3,BG72,BG11,BG10,R20,R00. The image was cut and embossed with Spellbinder's Nestabilities Labels 8. then I sponged the edges with Memento London Fog. I used some Bronze shimmer paper to frame the image. I had to trace the Labels 8 and cut it out by hand. The card base was a cream Bazzill Bling cardstock. The patterned paper was Basic Grey Cappella collection and I inked all the edges with versa colour pinecone for a distressed look and make them pop a little more. I added some flowers from Making Memories Mocha collection, coloured a cheap dollar store brad with copic to match the colours. The leaves were punched and then I added some green sheer ribbon. The inside of the card was finished with some scraps from the patterned paper and Happy Anniversary was stamped on the inside.

Sunday, September 5, 2010

iCopic Challenge #3-Pink/Red/White Tilda


This is a card I made for the iCopic Challenge #3. You were to use Pink, Red and White in the card. I began with a burgundy red card stock by Prisma along with some white cardstock by Bazzill. The patterned paper is from Basic Grey "Indian Summer" collection. The stamp is Magnolia "Tilda with Hair Bow" which I stamped using Memento Tuxedo Black ink and coloured with Copics - E11,E00,E000,R20,R89,R85,R83,R81,E99,E97,Y21,Y11,YG99,YG95,YG93,YG91,C3,C1,C00. The image was cut and embossed using Spellbinders Nestabilities Ovals and Scalloped Ovals. The edge was sponged with Memento Angel Pink, the wings were done with Clear Star Gelly Roll pen and I added 3 white half pearls along with white satin ribbon.

Saturday, September 4, 2010

Standing Tilda


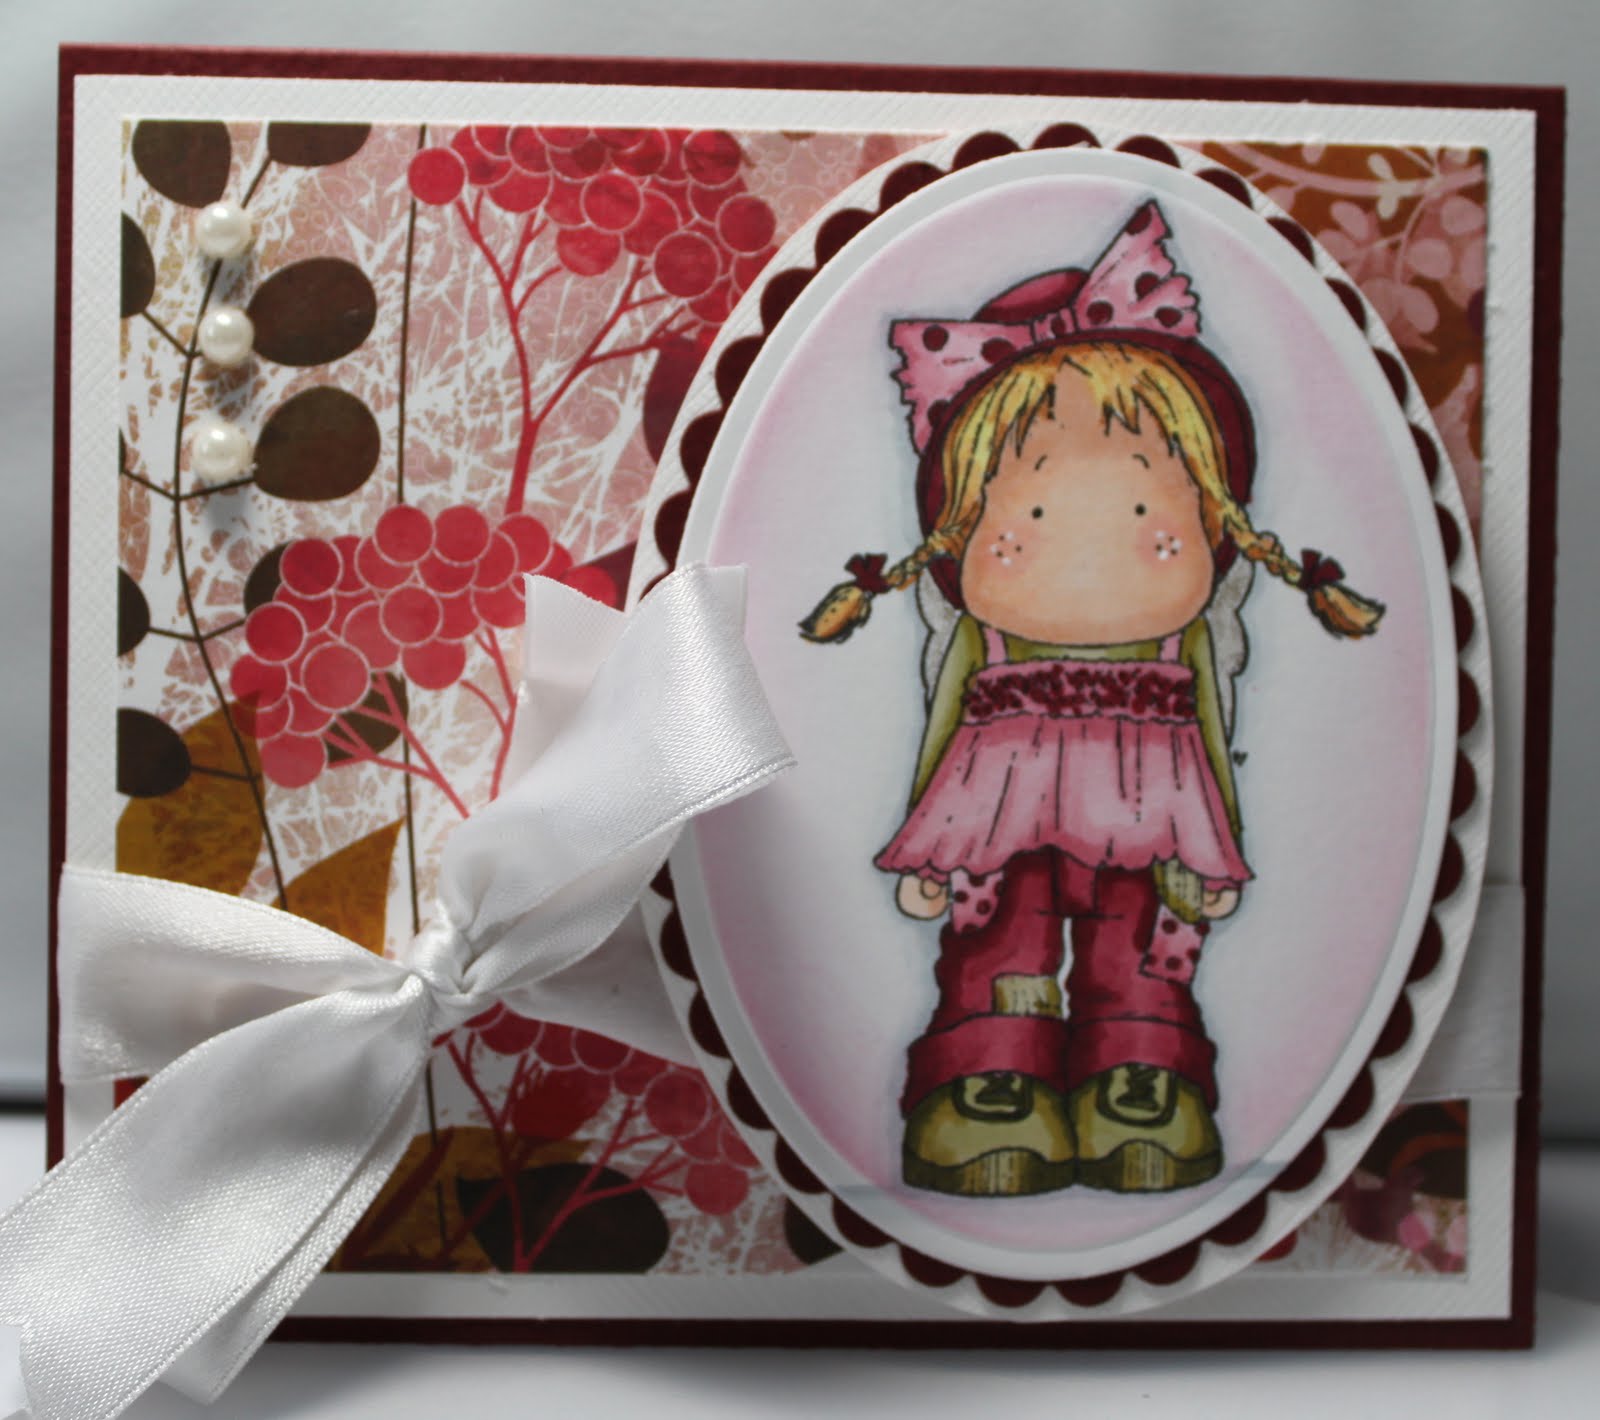
Just finished this card and pleased with the results except for a little smudging I hadn't planned on and if I did it again I would move the image and the patterned paper it is on down some more. It seems a little top heavy to me. Anyway, the image is a Magnolia stamp called "Standing Tilda with Hair Bow". It was stamped with Memento Tuxedo Black ink and then coloured with copics - E11,E00,E000,R20,E49,E59,E25,E53,E41,E42,E43,E44,Y21,Y23,Y26,YR23,YG99,YG95,YG93,YG91. Then the image was cut and embossed using Spellbinders Nestabilities Petite Oval Small. The inside edges were sponged with Versa Magic Sage and the edges of the papers were rubbed with Memento Rich Cocoa. The patterned papers were from My Mind's Eye "Home" collection. The orange paper was embossed with my cuttlebug and the swiss dot folder. The green polka dot paper was cut with Spellbinder's nestablilities scalloped ovals. The base of the card is a green Bazzill cardstock. I embellished with Prima flowers, the leaves and pearls spray were from the dollar store, and the the green half pearls are from Basic Grey Opaline collection.